Saturday, August 30, 2008

Free Pattern for Oregon Summer Beach Scarf


This post contains a free pattern for the Oregon Summer Beach Scarf which is based on a stitch pattern described by Barbara Walker, in A Treasury of Knitting Patterns, as the right diagonal version of "Diagonal Faggotting Stripe Pattern." The pattern is suitable for advanced beginners.

The yarn used in the model, from Yarnia in Portland, OR, is a fingering/sock weight yarn composed of three untwisted strands of different fibers. You can order online from their website. You'll want to buy 6 oz. of fingering/sock weight composed of cotton combined with rayon, linen, or silk. For more on the yarn and a close-up photo see my previous post.

Before I provide the link for the free PDF file, I want to say a little bit about knitting pattern instructions and my goal when providing patterns for my designs.

Historically, pattern instructions have been composed primarily of written words which are given in row-by -row instructions. Usually the author or publisher is nice enough to begin the instruction for each row of knitting on a separate line of type so you can follow along using a ruler or a sticky note.

At other times, the row-by-row instructions are all bunched together in paragraphs with little regard for presenting the knitter with a page layout which would aid in following the instructions. For me, a non-auditory learner, this is the printed equivalent of a lecture. All the information is there, but it's difficult, or at least time-consuming, to grasp if your primary learning mode is visual.

Many designers now give a visual chart of the pattern motif that shows one repeat of the stitch pattern and the beginning and end-of-row stitches. This is a better approach to only giving us visual learners written instructions. The Oregon Summer Beach Scarf has a 10-stitch x 20 row repeat and a total of 12 stitches making up the beginning and end stitches. Here is what the single motif graph would like:
What I would really like to see as the knitter trying to make this scarf, though, is more of the pattern graphed. Seeing several motifs side by side would help me to grasp the repeat and how it flows in the finished item. The repeat between the two vertical, colored bars of the stitch pattern can be inserted in the graph any number of times. Below is what the graph looks like when the repeat is duplicated the same the number of times that it is used in the 52-stitch-wide scarf.
Isn't that better? In this graph you can more clearly see where you're headed as the knitter.

Let's go one step further and think about the repeat as it feels to the knitter in action. The repeat is not what appears between the two vertical bars, which in Chart A changes on every row.

The repeat is the sequence of stitches "(K2tog, YO) twice, K6". Looked at this way, the repeat is not vertical, but diagonal. Showing only one "repeat" as in Chart A is barely adequate and asks me to think harder than I want while also watching TV or a baseball game. In the knitting grid which follows, the repeats are color-coded alternately pale green and tan so that you can more easily see the repeating element as you knit the pattern.

In the free PDF pattern for the Oregon Summer Beach Scarf the chart is colored in the same way. I hope you like it.

Two additional pattern notes:
  • The knitting graph and all of the written instructions appear on the same page.
  • There is a progress box in the lower right corner of the page where you can keep track of how far along you are in the pattern by making a check mark every time you complete one 20-row repeat.
If you make this scarf, let me know if you liked the pattern layout or whether you think it could be improved somehow. Your feedback will help me with my goal of providing future instructions in ways that best benefits knitters.

Monday, August 25, 2008

First Product Photo Shoot

Selling on Etsy.com is a competitive undertaking because there are so many sellers there now and they have a lot of great products for sale. To really stand out, good presentation is paramount. Nowhere is this more important than in your product photos. This is a big disadvantage for me because I truly suck at taking close-up photography!

Successfully photographing products like jewelry, crafts and collectibles is a real challenge. The photos have to be taken at close range in just the right lighting conditions so that the image is crisp and the item is not washed out or over exposed.

A lot of great photos can be taken outside on overcast days (something we have an abundance of here in Oregon) when the weather is dry. (Oh-Oh!) Okay, so if outdoors doesn't work for you, you can use a lightbox. A light box, or light tent, is like a miniature photography studio that you can fit in a small space.


Here's the frame for a large temporary light box that Dennis built for me out of PVC pipe. He's also ordered me a professional tabletop one that comes with special lights and some backdrops for a birthday present. What a guy!

Notice that Samba, the world's best little sweetie-pie of a cat, is totally uninterested in the PVC frame. But just wait. When I drape a white sheet over it to make a light tent and install a nice white backdrop/floor, don't you know she'll be thinking it's her own private guest quarters.

So I will either have to keep her away or ALWAYS scrupulously clean it before taking photos of anything in it. Guess which scenario it will be.


Here's the photo-shoot setup.

The lamps on the sides flood light on the fabric which acts as a diffuser. These lights are not the best, but in this temporary setup they were serviceable. One had an OTT light bulb and the other a "daylight" bulb. Whichever kind of light you use, don't keep them too close to the fabric for very long or the fire department might be trying to join in the fun. The backdrop is a large piece of white matte board. (If you want to make your own setup like this, you can find instructions for making a PVC lightbox here and here.)

Now you may think that the purse handles on the handbag naturally stand up straight and perky like that. Think again. They were floppy things and had to be tied in that position with invisible nylon filament thread.

Have you ever worked with that stuff? Its the jumpiest, curliest, most pesky fiber you can imagine. Just loves tying itself in knots. Before I got those purse handles picture perfect that filament had wrapped itself around my ankle and made a couple of circles around my big toe and then slipped under the buckle on my sandals just before the spool rolled across the room. This was discovered as I tried to retrieve the spool and nearly pulled over the whole contraption. In some of the photos the thread showed a little, but in most shots it didn't. Out of the thirty pictures I took, I got three good ones.

Yikes, at that rate I'll never make a profit on Etsy! I'll be spending all my time trying to get those 5 perfect photos allowed for each item.

Here's a close up of the bag showing the twin frames. Isn't this about the cutest handbag! I'm in love with it even though I almost always carry shoulder bags.

I didn't get around to trying to get a close-up photograph of the inside of a this bag which has a black grosgrain lining. Guess that's the next challenge.

A great way to end the day yesterday, after the photo shoot and blogging, was watching the closing ceremonies of the Olympics. Talk about your cirque du soleil chinois! What an amazing spectacle! I could have used some of that nylon filament to keep my jaw up off my chest because my mouth was agog out of awe most of the time that I watched. If you missed either the opening or closing ceremony, NBC is selling a DVD. It's destined to be a classic!

Sunday, August 24, 2008

Learning Blogger and More

Being new to blogging and not being a technical wizard, I find every new little blog thing a big old challenge. Yesterday I added content to the blog's side bar. It's not totally I want it to be yet, but at least it's not vacant real estate over there.

Today's first project was researching how to embed a PDF file so that readers can easily get free patterns by clicking on a link. Once I get it figured out I'll be posting the free pattern for the Oregon Summer Beach Scarf Pattern. Today's second task was a hands-on project to set up my very first product photo shoot.

Meanwhile this weekend has not been all work and no play. Last evening we enjoyed a Summer Waltz Under the Stars at Laurelhurst Park in Portland This is an annual event hosted by Portland Dance Eclectic . A temporary parquet wooden floor is set up in the park and the surrounding trees and shrubs are filled with tiny twinkling white lights. It's such a thrill to dance a romantic waltz or foxtrot in the slow breeze of a warm summer night surrounded by the swirling white and pastel gowns of Northwest women enjoying a chance to get out of Birkenstocks and flannel shirts. (Just kidding!)

Of course getting ready for such an event is an opportunity to participate in one of my favorite things: vintage and resale clothes shop-hopping! During the hunt I bagged a fantastic caramel-colored satin gown from the 40's that fit perfectly and also found some great clothes for tango dancing, some stuff to where to the office, and a couple of good packable things for travel. Other than the ball gown, my favorite find was this vintage handbag. It's in fantastic shape, and I might have to fight my friend Melanie for it when she sees it.

Well, I'm off to watch the last night of the Olympics. I'll talk about the first photo shoot tomorrow.

Thursday, August 21, 2008

Pink Oregon Scarf Goes to the Beach

Last Friday the weather prediction for Portland was 100 degrees. There had been recently no time for leisure between the cubicle job, preparing to launch my online Etsy business, watching the Olympics, trying to learn Adobe Illustrator, trying to learn macro digital photography of products, and starting this blog. Pink Scarf and Mr. ChaCha both wanted to go to the beach. So I decided to go with them.

Our first stop was the Sea Lion Rocks at Ecola State Park. The above photo and the one of the metal sculpture were taken by me. If only my close-up photos came out that good.

It was a good twenty degrees cooler at the beach and there was a healthful ocean breeze. It was the perfect temperature for Pink Scarf and me. Mr. ChaCha captured this photo of the two of us trying to spot a sea lion. Neither Pink nor I could see a single one.


A cotton/linen/silk/poly scarf like Pink is a perfect companion for the beach--not too warm to wear, just the right amount of neck protection from the sun's rays and any wind hyperactivity, but not so precious that you would feel guilty using it to wipe the sand off your feet at the end of the day.

The next stop was Cannon Beach which we entered at the end of 5th St. We stopped here because just before the beach entrance was this great scuplture planted in the middle of the street's turnabout. It appealed to me because it looks like knitted people from a distance. Closer up you can see that it's made of welded strands of metal and that the people are Lewis & Clark with Sacagawea.


The sculpture commemmorates a visit by them to the beach to see a 105-foot beached whale. Read more about the occasion here.

After kicking around the beach, taking lots of photos, finding some long sea grass to crochet, and getting drenched to the knees by a wave, it was time to explore the town, get a bite to eat, and head back to Portland before all the weekenders arrived.

Pink loved it all so much that I've decided to officially name her "Oregon Summer Beach Scarf." I'll post a free pattern for her soon.

Wednesday, August 20, 2008

Oregon Pink Scarf is Born

Knitted or crochet scarves to wear in the summer? Why not?

If you're lucky enough to live close to the ocean or a lake, or if you work in an overly air-conditioned office, you need some summertime scarves. I keep one in my desk drawer at the office along with extra socks, leg-warmers, hand-warmers, and a heating pad. When that air conditioning kicks in at full blast, it's preparation that counts. (A colleague even keeps a blanket and a hat in her cubicle.) And at the beach, you want to look stylish when you layer up.

Good fibers for warmer weather include cotton, linen, flax, bamboo, and rayon. They breathe better than the cold weather fibers and they have a nice drape. You can block them or not depending on the effect that you want. I like unblocked or mildly blocked summer scarves so I can stuff them in a beach bag or briefcase without feeling guilty.

On June 8 of this year, my partner, Mr. ChaCha, & I decided to go on a day trip to get out of the house and celebrate some long-awaited nice weather and blue skies. We decided to drive up to Mt. Hood to have dinner at Timberline Lodge, where part of the movie, The Shining, was filmed. (City slickers that we are, we didn't much consider that it would be COLDER at 6,000 feet elevation than it was on that balmy day in Portland.)

Since Mr. ChaCha was kind enough to drive, I was able to start knitting from a cone of yarn I had gotten from a fun store in Portland called Yarnia which allows you to custom select multiple thin fibers to be wound onto a single cone for knitting together. The strands are not plied, so the end result gives a mottled effect similar to that of a knitted marled yarn.


These are the fibers I had chosen at Yarnia: (1) the top strand is a pale pink linen/cotton blend, (2) the middle one is a variegated rayon/cotton blend of pinks and burgundy, and (3) the bottom strand is a medium pink of raw silk and polyester. They were intended to become a beach scarf--something you can use in Oregon even in the middle of summer.

While Mr. ChaCha merrily drove I happily cast on . After a couple of inches of scarf were knitted and many miles were driven, we both realized that it had become noticeably cooler and observed that, silly us, we had each worn a light spring jacket. This is not so much an issue for him because he's a warm-blooded hunk of a guy, but I run cold. Naturally, then, I immediately thought of knitting by the fire in the lodge while Mr. ChaCha hiked around outside taking photos with the camera he had brought along.

As we got closer to Timberline, we were additionally surprised at how much snow was on the ground--and freshly fallen snow, at that--in June! To get some idea of the accumulation of snow, observe the people walking down the front stairs of the lodge. It had snowed the previous evening and more snow was expected that night. Now it was downright cold outside!


After a great meal I settled in for knitting in the lodge while Mr. ChaCha took photos. One of my favorites is this shot of Mt. Jefferson shot from the rear of Timberline Lodge.


The time passed quickly and the sky started getting dark. Unknown to me, I had been candidly photographed working busily in the lodge.

It was time to hightail it out of that neck of the woods, before more snow started to fall. On the drive back to Portland, it was too dark to knit!

Saturday, August 16, 2008

My Knitting Marathon Begins & I Finish on Time!


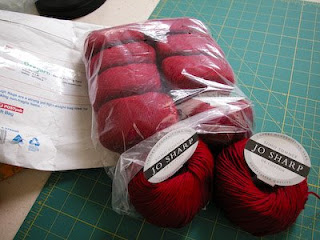
Such relief I felt when the package of Jo Sharp Soho Summer in Carmen red arrived from Australia the morning after the 2006 Winter Olympics opening ceremonies. After so many hours of training spent swatching and building charts, my fingers were itching to start moving those needles!

Before casting on, a last minute search on the Internet for lace-knitting tips yielded a tip that saved my behind many times while knitting the Dianna lace ruffle sweater: when knitting lace, periodically run a yarn of a contrasting color through all the stitches on a row. Then, if you have to rip back, and you will only have to rip back to this lifeline.

Eight days after starting to knit, I was at the half way point and knew I needed to pick up speed in order to finish the pieces, block them and sew them up by the closing ceremony. The needles started coming out before breakfast, during lunch hour at the office, and until the wee hours on every remaining day until the final Sunday. The sweater took approximately 75 hours, not including the 25 hours of training, and was finished on Sunday night. The photos were taken before the closing ceremony was broadcast. Phew!

Now, I need to go practice tango, so I can wear this sweater to a milonga.


Thursday, August 14, 2008

Training for the Tango Sweater Challenge-Part 2

In order to be able to actually watch the 2006 Winter Olympics while knitting the Dianna sweater designed by Adrienne Vittadini, I needed to have a detailed chart.

Most knitting charts that come with patterns for garments are just charts of the stitch design(s) used in the item. This is helpful, but since the patterns don't layout the entire garment in a chart, you can easily get lost on a complicated project if you are not being religiously focused. So, if you typically have an attention deficit, and you add to that the distraction of watching a pair of ice skaters execute side-by-side triple axels, you could have a veritable tangled-up mess trying to knit a lace sweater at the same time as watching the Olympics.

While waiting for my yarn for the tango sweater to arrive from Australia, I pondered this and wondered how I, a novice at knitting lace, could meet the challenge.

Some Ondori crochet books in my library got me thinking. These Japanese pattern books have immensely intricate and intelligent crochet charts that are so good you hardly ever have to refer to the written instructions. The various crochet stitches in a complex lace pattern is no problem to follow because the graphic layout of the various stitches in their exact placement in the project is such a marvelous visual guide. I had crocheted many a doily without reading a word of text by just following the charts.


Why couldn't knitting charts be this thorough? Knitting would seem to be easy to lay out because it is essentially a grid of stitches. This is the thought process which let me to open Microsoft Excel for Mac and start chunking out a chart for each piece of Dianna.

As far as I can remember, here are the steps that you would need to do this (in case you are as crazy as I am and want to try this at home):
  1.  Download a knitter's symbol font and install it. 
  2.  Open Microsoft Excel.
  3.  Figure out how in the heck to type the correct font symbols.
  4.  Set up a blank worksheet page for each piece: back, sleeve, right front, left front and back. 
  5.  Reduce the cell size globally to a small size that is just large enough to accommodate a  single font symbol.
  6. Set up a legend/key of all the symbols needed for the pattern: see the green box on the illustration of the beginning of the right front.
  7. Create the outline of the piece by laying out the cast-on row and the selvedge stitches. [In the photos and illustrations the selvedge stitches (cells) are shown in orange.]
  8. Fill in the first row after the cast-on row at the bottom of the grid.  (For this step, you CAREFULLY read the pattern instructions and cut & paste symbols from the legend into the appropriate grid space, building the bottom row from right to left just as you will be knitting it.)
  9. Then fill in rows 2-18 still working VERY CAREFULLY!
  10. Now the fun part begins because you can cut & paste whole sections like snippets of code. See the two red rectangles drawn on the grid?--They outline two identical motifs. You can fill in the outline created in Step 7 with columns and rows of these pattern motifs by using Excel's cut & paste feature.  Click on the illustration for a close up view.
  11. After as many motifs are pasted that will fit logically inside the outline, you start filling in the beginning and endings of rows and all the blank space remaining, using the written words of the pattern as a guide. Here's the top of the right front sweater:
  12. Wahoo! Go have a glass of wine.
  13. Repeat steps 7-12 for each remaining pattern piece.

Here's the complete back chart:


Here's a side front and a sleeve:


It took around 25 hours of training to build these charts and knit a couple swatches. It kept me busy while I was waiting for the Carmen red cotton to arrive from Australia.  The night of the opening ceremonies, the yarn had still not been delivered, so the opening ceremonies were spent finishing the final grid for the sleeve.

Finally, the very next morning, and not a moment too soon, the package arrived:

Sunday, August 10, 2008

Training for the Tango Sweater Challenge-Part 1

While waiting for the yarn for my 2006 Olympic sweater event to arrive from Australia, I spent some time swatching with the two sole remaining balls of Jo Sharp Soho Summer in Carmen red that remained here in the United States.  It was a summer weight cotton so it was no surprise that it wasn't still hanging around in inventory during the winter.

I had already made one swatch before ordering the yarn and knew that it would be a stretch for me to knit this pattern.  An additional challenge would be the fact that the Soho Summer yarn knit up at a tighter gauge than the Vittadini yarn for which the pattern was written. To compensate for the difference, I had already calculated which larger pattern size needed to be made in order to come up with a sweater that would fit me when knit up in a tighter gauge. The yardage difference of the balls of Soho Summer compared to the Vittadini yarn had also been factored in the amount ordered. If the ten balls arriving from Australia were not enough, the lace ruffle could surely be made out of the two balls on hand, even if the dye lots were a little different. Right?

During swatching, it soon became apparent that although the pattern for the Adrienne Vittadini sweater named Dianna is technically correct, it was clearly not developed with customer service or ease of use in mind.  Beyond that, the single page of skimpy instructions would never be adequate for an intermediate knitter to follow while watching the Olympics.  I could hardly follow them straight up, let alone while watching Belvin and Agusto dance their flamenco on ice.

I'd need a chart. There was no chart!  

Oh sure, there was a schematic showing the finished length of everything, but there was no chart of the knitting pattern.  To make matters worse, the instructions said mind boggling things like this description of the waist shaping on the left front:
K1, M1, work in Lattice St to last st, M1, K1. Keeping 1 st each side in St st for sel, and working incs into pat when possible, rep inc at beg of RS rows every 8th row 5 times more AND AT THE SAME TIME, at the end of RS rows (Front edge) rep inc every 4th row 5 times (7-5) times more.
For the right front guess what it said: work as for left front, reversing all shaping. Grrrrr!

Saturday, August 9, 2008

Olympic Tango Sweater

How about those opening ceremonies last night? Wow! How can any subsequent host country ever top the spectacular show put on by China? Will they even try?

The opening ceremonies definitely put me in the mood to undertake something spectacular for the 2008 Summer Olympic Knitting Trials, but this Olympic season finds me swamped! So I've chosen to work on finishing products for the upcoming opening of my online store, and since I did not have a blog going back then, I decided to write now about my previous sweater knitting event from the 2006 Winter Olympic games.

In 2006 I had been fantasizing about having the time to really focus on getting good at Argentine tango but didn't really have that kind of time; however, I did have time to dream about the perfect sweater to wear to a tango ball. Here in Portland there's an annual February event called ValenTango and folks come from all over the world to attend workshops and dances. The Saturday night ball is a time to dress up. I imagined a gorgeous lace sweater in the perfect Spanish red.

The challenge was that without much experience with lace I had not found a sweater pattern that was compelling enough to make me want to try knitting it--until this pattern came along, that is.


This sweater demanded to be coveted! That gorgeous diamond lattice motif, the subtle bolero shaping in front, and that ruffle! Oh, my Precious! (AKA Dianna, Lace and Ruffle Cardigan)

Dianna was designed to be knit from a lovely cotton with the Adrienne Vittadini label. Trouble was, it didn't come in that perfect Spanish red and it didn't come in any color close. A furious search for the color in local yarn stores yielded only one possibility, Soho Summer cotton yarn by Jo Sharp in the color she calls "Carmen".

So when Stephanie Pearl-McPhee got us all riled up about undertaking a grand challenge of Olympic proportions back in 2006, there was no question but that Dianna would be fashioned in Carmen red by my own inexperienced lace knitting hands. The trouble was, only two of the needed balls of yarn were in town and none were to be found online in the states and there were only a few weeks before the opening ceremonies!

After a furious search, I found the yarn in Australia, ordered it online, and got obsessively busy training with the two balls I now had on hand and Excel. But that's for the next post.


Sunday, August 3, 2008

Ah, la cart! Out of the Box Thinking


Here are the components of a stainless steel cart that were waiting for me after the last blog post. Although not the kind of project that you can hold in your lap and pet like a cat, it is a perfect task for fulfilling that occasional DIY furniture-making urge. The cart was purchased from a big box retailer whose shopping experience quells you into thinking you can easily take home three or four boxes of potential furniture and put it all together in a snap.

The steel parts came in a box with a little bag full of hardware and an instruction booklet. All the hardware was there when I started and it was there when I finished, but there was a brief period of time in the middle of construction in which a couple of nuts and a bolt went AWOL.

The booklet was great--no words, only pictures of the kind that surely belong in the category "Cart Assembly for Dummies" which, believe me, is my personal rating when it comes to making stuff from out of a box. The simple and clear illustrations were laid out in a logical order. After the errant hardware returned it was a fairly straightforward process. Before I knew it, the cart was finished.

Then the only problem which remained was how to lift an extremely heavy glass jeweler's case from a table which was one and a half inches lower than a cart which had wheels on two legs. Since I was home alone and had no patience for waiting for help to arrive, I turned to logic and philosophy.

If I wedged the fingertips of one hand under the very edge of one side of the glass display case, a little shim of cardboard torn from the original packing box could be wedged under one of the four chrome feet upon which the two tier glass case rested. I reasoned that I could keep shimming up each little foot with one cardboard shim at a time rotationally until I had the glass case raised up about a half inch. Then came the philosophy part.

Four books were chosen from a nearby shelf for their depth--or thickness, if you will: The Dream and the Underworld by James Hillman, I and Thou by Martin Buber, Cosmic Questions by Richard Morris, and The Origin of Humankind by Richard Leakey. Perfect! A book was maneuvered into place under each footing and the whole thing was now upon solid ground.

Now I started shimming again with my little cardboard pieces on top of the books. When the case was raised a little over an inch, I applied a little body English to one side of it and tilted it slightly in one direction while lifting it so slightly in the opposite direction at the same time, all the while holding my breath and praying that the whole shebang would not go toppling over the side of the balcony on which it and I stood. And it worked!

Here is a finished picture of my success.